Pingora Peak, Wyoming
Climb and Route Description

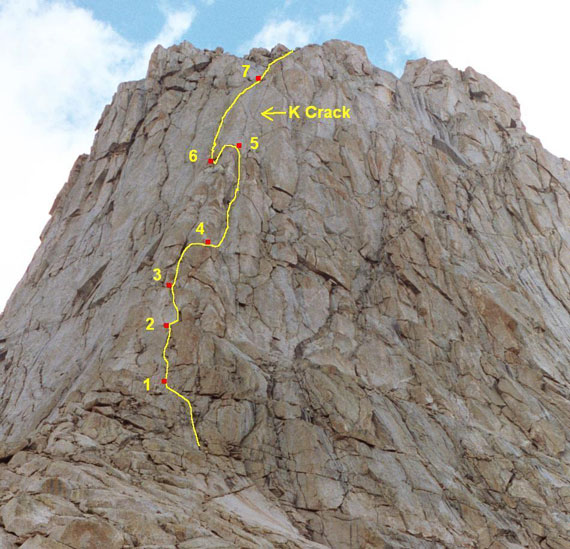
This is the South Buttress or South Ridge route. It is rated 5.6 or 5.8 (both Grade II) depending on which variation you take once you get below the K crack. Note that the above photo shows the 5.6 variation of this route. The route which you see in the above photo is what you will see once you have climbed up to the south shoulder of Pingora.
To get to the south shoulder, hike NW from Jackass Pass toward Cirque Lake and Overhanging Tower. Under the south shoulder of Pingora, you will find a climber's trail
and cairns to help guide the way to the start of the climb to the shoulder. The climb up the shoulder is considered solid class 4.
The little red squares are belay ledges. Note: The lower section of this route description is a little different (not harder) than in Kelsey's guide.
Pitch 1: (Class 3) Scramble to a good ledge under a block ladder-looking formation.
Pitch 2: (5.6) Use blocky terrain and a crack to gain about 30 ft.
Pitch 3: (5.5) A nice crack gets you to a solid ledge below a chute. You can combine Pitch 1 and 2, but there will be rope drag.
Pitch 4: (5.6) Move up for 30-40 ft, then traverse right along a narrow ledge. Belay at the end of the ledge.
Pitch 5: (5.6) This is the longest pitch at around 130 ft. It's very important that you do not belay for this pitch inside the right-facing corner. Instead, belay on the narrow ledge at the top of pitch 4. There are loose rocks in the corner and if the leader pulls one off, the belayer will have no escape. At the top, belay from a boulder anchor on a huge ledge.
Pitch 6: (Class 3 or 5.8) After the long right facing corner, scramble up to the ledge below the "K" crack. If doing the 5.8 version of the "K" proceed directly up the "K" and finish at a rap station. Scramble up about 10 ft, traverse to the left a bit on a ledge, then scramble up a short distance to the summit. If doing
the 5.6 variation, down-climb class 3 about 10 ft. to the climber's left of the "K" crack to a small ledge. A rap station will be seen.(Note: The photo shows the 5.6 variation)
Pitch 7: (5.6) Climb the obvious crack about 120 ft. to a ledge. The summit is a scramble from here. This ledge is where most leave the ropes and gear. The first rap station for descent is to the climber's right of this ledge and a short down-climb.
Descent: Downclimb and rappel the route. From the summit, scramble down the third class section to the ledge at the top of P7. If you did the 5.6 variation at the "K", you will have to look hard for your first rap station. It is located directly above the K crack on a ledge to the climber's right at the top of P7. It's actually about 10 ft below the ledge requiring a somewhat exposed downclimb to get to it. This rappel ends on the ledge at the class 3 section between 5 and 6.
The second rap is at the number 6 in the photo and you will have to downclimb 10 ft to get to it. Do a double-rope rappel of about 160 ft to the ledge at belay station #3. You will have to angle your rope throw to the left (east) to accomplish this rappel. Also, beware of a large crack at the top of the long rappel which can snag your rope. From belay ledge #3, you can do
two short rappels to the base or one long double-rope rappel to the base.
Gear: Two 60 meter ropes; Cams to a #4 with doubles on the mid sizes; set of stoppers; several unsewn full runners, at least one extra long piece of webbing or cordelette.
USE THIS AT YOUR OWN RISK! I MAKE NO GUARANTEES THAT THE ROUTE OR PHOTOS ARE ACCURATE OR CORRECT.
© Ellis Adventures, LLC

